How to Add Steam Workshop Mods and Admins to a Project Zomboid Server
Install Steam Workshop mods on your Project Zomboid dedicated server, set up your admin account, and give admin to your friends. A step-by-step guide for PLAYERTICK server owners.

Project Zomboid is at its best with a group of friends and a handful of mods. The Steam Workshop has thousands of them, from new vehicles and weapons to entire towns to explore. On a dedicated server, you add mods by listing them in the server's config file, and the server downloads them from the Workshop itself. There's nothing to upload.
This guide shows you where your server's config lives, how to add Workshop mods, and how to set up admins so you can manage your world.
Prerequisites
- A Project Zomboid server. You can view our plans here.
- The Steam Workshop pages of the mods you want to install.
Part 1: Your admin account
Step 1 - Check your admin details
- Log in to the client area and open your Project Zomboid server.
- In the left-hand menu, click Settings, then scroll down to Startup Variables.
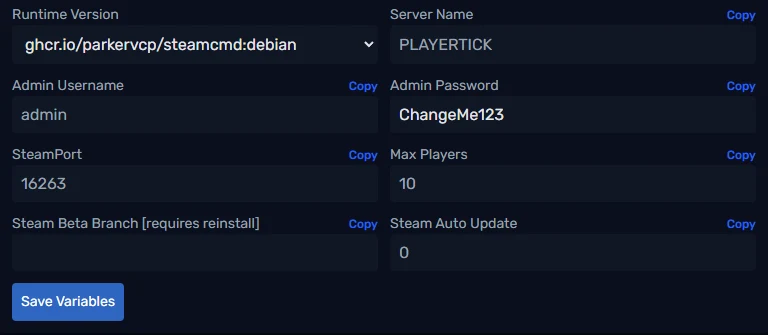
The fields you care about here are:
- Server Name: the name of your server's save and config files. It's
PLAYERTICKby default. Don't change this once you've started playing. Changing it points the server at a brand new set of files, so it looks like your world and settings have vanished. They haven't; change the name back to get them back. - Admin Username and Admin Password: the built-in admin account. Log in to the server with these to get full admin powers. Change the password to something only you know, then click Save Variables.
- Steam Auto Update: set this to
1if you want the server to update itself every time it starts. With0it skips the update check, which starts faster but can leave you on an old version after a game update.
Max Players is set by your plan. Upgrade from the Change Plan section on the same page if you need more slots.
Step 2 - Give admin to other players
You don't need to share the admin account. Instead, have your friend join the server with their own username, then grant them admin from the panel:
- Open Console from the left-hand menu.
- Type the following, using their exact in-game username, and click Send command:
setaccesslevel TheirUsername admin
If the username contains spaces, wrap it in quotes. You can also type /setaccesslevel TheirUsername admin in the in-game chat while logged in as an admin.
From most to least powerful, the access levels are admin, moderator, overseer, gm and observer. Setting none removes access.
Part 2: Installing Workshop mods
Every Workshop mod needs two pieces of information:
| What | Where to find it | Looks like |
|---|---|---|
| Workshop ID | The number at the end of the mod's Workshop URL (?id=...), or "Workshop ID" at the bottom of the description | A long number |
| Mod ID | "Mod ID" at the bottom of the mod's Workshop description | A short name |
Some Workshop items contain more than one mod, and so more than one Mod ID. Add the ones you want to use. Copy each Mod ID exactly as the mod page shows it.
Also check the mod supports the game version your server runs. Many mods have separate versions for Build 41 and Build 42.
Step 1 - Stop your server
Click Stop in the top right of the panel and wait for Status to show OFFLINE. Project Zomboid writes to its config files while running, so editing them with the server online can lose your changes.
Step 2 - Open your server's config file
- Open File Manager from the left-hand menu.
- Open the
.cachefolder, then theServerfolder. - Click the
.inifile named after your Server Name. By default that'sPLAYERTICK.ini.
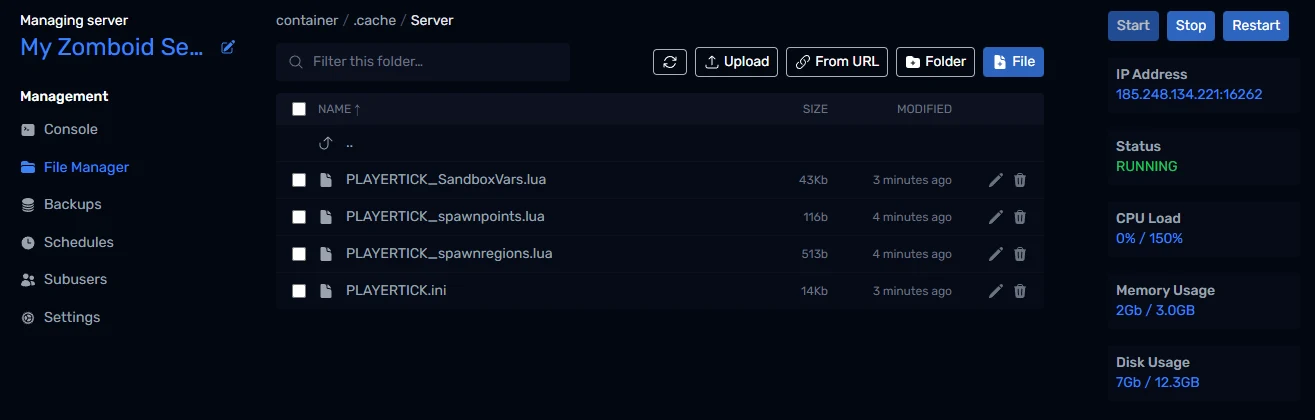
This folder also holds PLAYERTICK_SandboxVars.lua, which controls your world's sandbox settings, such as zombie population, loot rarity and day length.
If you've followed a guide elsewhere that mentions servertest.ini, this is the same file. It's named after your server rather than the default "servertest".
Step 3 - Add the mods
Find the WorkshopItems= and Mods= lines in the file. The file explains each setting in the comment above it.
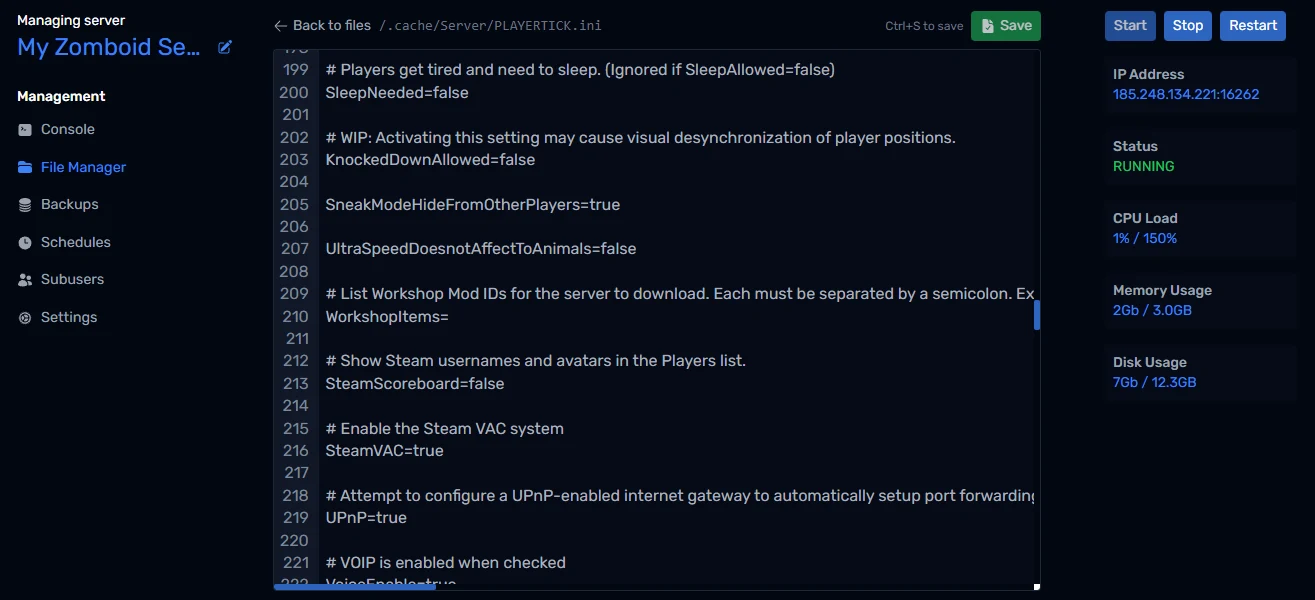
Add your IDs, separated by semicolons with no spaces:
WorkshopItems=<Workshop ID 1>;<Workshop ID 2>
Mods=<Mod ID 1>;<Mod ID 2>
WorkshopItems=tells the server what to download from the Workshop.Mods=tells the game which mods to switch on.
Both lines need to match up. A Workshop ID with no Mod ID downloads the mod but never loads it; a Mod ID with no Workshop ID won't be found.
Map mods
Map mods need one more step. Add the map's folder name to the Map= line, before the base map, separated by a semicolon:
Map=YourMapFolder;Muldraugh, KY
The mod's Workshop page usually lists its map folder name.
Step 4 - Save and start
Click Save (or press Ctrl+S), then click Start. Open Console to watch the server download your Workshop items. The first start after adding mods takes longer than usual, depending on how many you've added.
Players are prompted to download the same mods automatically when they join.
Troubleshooting
"Workshop item version is different than the server's" when joining. A mod updated on the Workshop after your server downloaded it. Restart the server so it pulls the latest version, and ask your players to restart their game.
The server won't start after adding mods. Remove your most recent additions from both lines and try again, adding mods back one at a time. Check each ID for typos and that you used semicolons, not commas.
My settings reset after I edited the file. You probably edited it with the server running. Stop the server first, make your changes, save, then start it again.
My world has disappeared. Check Server Name under Startup Variables hasn't changed. Your save and config files are tied to that name.
Wrapping up
That's it: your Project Zomboid server is modded and you've got admins ready to keep things in order. Stay safe out there, and keep those windows boarded up. If you get stuck, reach out to us on Discord or through support.